Friday, January 24, 2014

How to Make Fake Rocks From Hypertufa


You can make a lot of things with hypertufa, a light-weight concrete mixture made from Portland cement, vermiculite or perlite, and peat moss.  Basically put it in any mold and let it harden.  I've seen it put in disposable gloves to make a cement hand.  You can make pots for plants, cement furniture, whatever you can think of.

 You can play around with the mixture too.  Basically, it's 1/3 Portland cement and 2/3 other stuff.  I used an equal amount of peat moss and perlite for the rocks, because the peat moss makes a better texture for the outside of the rocks.  Using all perlite or vermiculite, omitting the peat moss, will give smaller pores in the rocks. I've also seen leaf castings made with saw dust used in place of the peat moss and vermiculite to give a smoother mixture.

Make sure you wear a dust mask when you're working with the dry cement. You don't want to breathe in cement dust.  Also, get a pair of heavy rubber gloves to use for mixing the hypertufa.  The disposable latex ones don't hold up too well.

Take a look at the video I made (it's been on YouTube awhile).  It shows everything you need to get started.


Thanks for reading.

Check out my other projects.


Sunday, January 12, 2014

Make Your Own Decorative Ladder

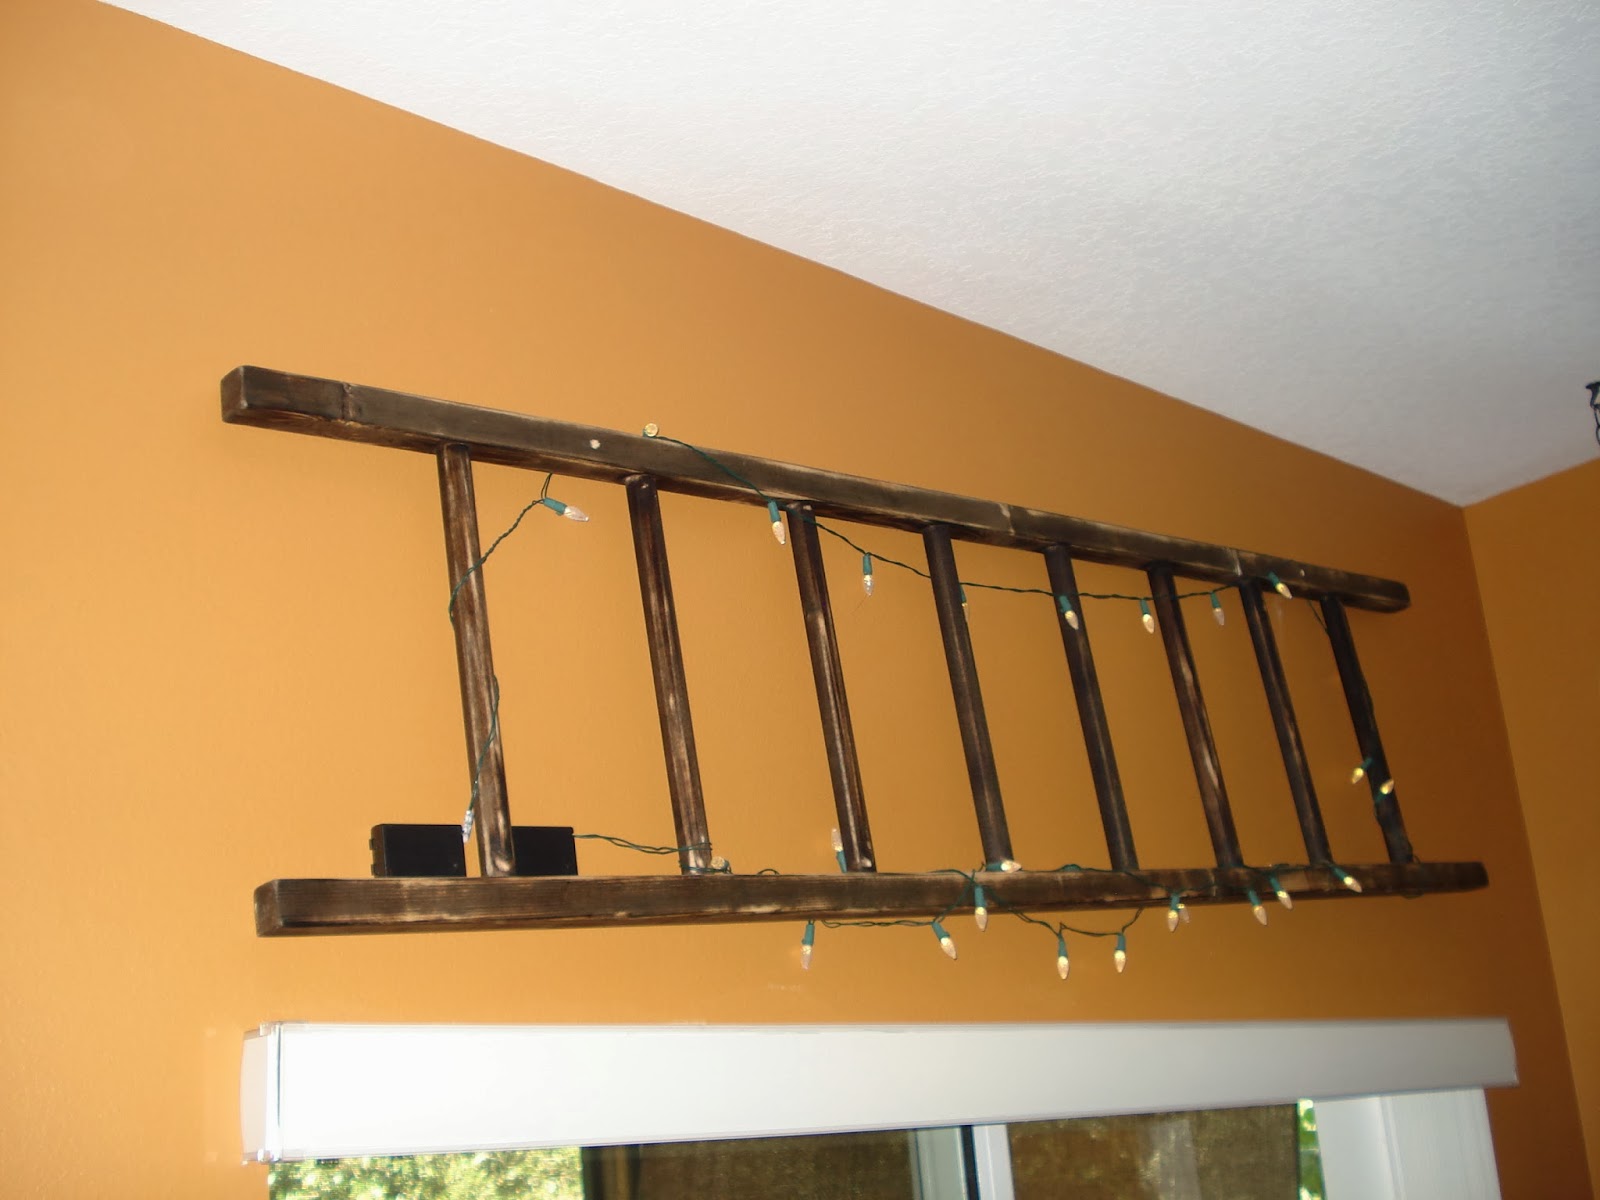
You can easily make your own decorative ladder to display in your house.  It only costs about $15 for the materials, which you can get from Home Depot.  I strung battery operated Christmas lights on this one (there wasn't an outlet nearby).


What you'll need for this project:

-- 2 - 2 X 2 pieces of wood. You can buy this size from Home Depot in 8 foot pieces or cut your own from a wider "2 by" piece if you have a table saw.  You may have to look through the stack, since most of the pieces aren't straight. If it's not perfect, it's probably okay; when you make the ladder, they will straighten, but try to get pieces that are straight as possible.

-- 3 - 48 inch, 1 inch diameter dowels (the round pieces)

-- Saw

-- Drill and a 1 inch drill bit.  I like to use a Forstner bit because it drills much smoother than a spade bit and the bottom of the hole is perfectly flat. 


-- Measuring tape and square, although just a measuring tape will do

--Wood Glue

--Wood Stain.  I used Dark Walnut color for my ladder, but use whichever color you like.

The first thing to do is to cut the 2" X 2" pieces to 72 inches (6 feet).  Then cut the dowels to 15 1/2 inches long.  Next, line up the 2" X 2 " pieces so that you can mark the spots where you'll drill the holes on both pieces at once. This is so the rungs of the ladder line up.  I use a clamp to hold them together while measuring.  Then, make a mark every 8 inches.  


Next, use a square to draw a line across the two pieces.


Then, if using a square like this one, set it to half the width of the wood, in this case 3/4", and make a mark that intersects the line you just drew.  This will give the center of the piece and where you will drill the holes for the rungs.


Drill the holes.  If using the Forstner bit,drill down to the top of the round part of the bit each time, like in this picture.


If not using the Forstner bit, just use tape to mark your bit so you drill the same depth each time.


It's now time to assemble your ladder.  Put glue in each of the holes.  Make sure you get glue on the bottom and the sides of the holes to ensure you get a sturdy ladder.  Assemble the ladder as shown, then wipe of any excess glue with a damp cloth.  Stain won't penetrate areas where there is glue.  It's good to then lay the ladder on a flat surface to make sure the two sides are parallel.


Allow the glue to dry for 24 hours, then put a coat of stain on it.  For my ladder, after the stain dried, I used some sand paper to sand some stain off of some areas to give it a  distressed look.  


Feel free to alter the size of the materials for the project.  You could use
2 X 3's instead of 2 X 2's and use thicker dowels for the rungs.  You can also change the spacing of the rungs if you wish.  

Thanks for reading.

Check out my other posts for more projects.


Sunday, December 22, 2013

Polymer Clay Christmas Earrings - Polymer Clay Cane Technique

My wife liked a pair of earrings she saw on someone and I told her that I could make those.  They looked like a chewy candy we used to have as kids.  They were rather easy to make out of Scupley polymer clay.  You can also use Fimo, if you prefer.  


I made a video showing how I did it.  The video shows the basic techniques to make a polymer clay "cane," and these techniques can be used to make other designs.   The cane technique allows you to start with a larger image and roll the clay down to make it smaller.  My wife had been wearing these for a few days now and people look at them in awe and wonder how they were made.  They ask, "Did you paint that on there?"  Take a look at my video; it shows everything you need and how to make these earrings.


There is so much you can make with Scupley or Fimo.  Make these earrings or get creative and make your own design.  It's a lot of fun.

Merry Christmas!

I'll see you next year.

Thank You

Tuesday, December 17, 2013

Christmas Cards (Last Minute Homemade)


This will be a quick post.  I went to the craft store today and they had Christmas stuff at 50% off.  I saw some cool Christmas stamps and decided to make some Christmas cards to give out with some last minute gifts.  If you don't need any more cards for this year, then keep it in mind for next year.  

All you need is the stamps, ink, and some card stock.

Here's what I got:


I stamped the words on the inside of the card.


Merry Christmas!!

Thursday, December 12, 2013

Christmas Ornaments With the Scroll Saw and How to Keep the Cats Away from the Christmas Tree


A book on Amazon called "Compound Christmas Ornaments for the Scroll Saw" by Diana L. Thompson caught my eye and I had to try making some of the ornaments in the book.  You do need a scroll saw for this, but if you don't have one, maybe making something like this will inspire you to get into wood working.  You can make a lot more than just Christmas ornaments with a scroll saw.  Just search the web for ideas on what you can make with this versatile tool.  If you need basic instruction for the scroll saw, or want to know more about it, there are tons of books on the subject and many videos on YouTube.


I've made a video that shows how I made the ornaments and everything you need to do it.  Here it is below:


I hope you have fun making these. Anyone who I've shown these to are amazed that I made them.  They look hard to make, but are really easy.  They make great gifts too.


While we're on the subject of Christmas ornaments, I wanted to share how I finally figured out how to keep the cats from taking the ornaments off the tree.  Check it out:


Sorry the picture is blurry, but I wanted to show what I used around the tree.  On the bottom right I have something called SSSCAT Cat Training Aid.  It's a can of compressed air with a motion detector on it, so when the cat goes near it, it shoot out a burst of air and scares him away.  It's very effective.  So I have one of those under the tree.  On the left side, the grey egg on the chair is basically the same thing as the SSSCAT, but it's made by Sunbeam and just looks different.


  I couldn't get one of these devices to sit right on the couch (to the right of the tree) to keep the cats off without setting it off every time I walked by.  So I put a Scat Mat (the plastic thing) on the arm.  It runs on 9-volt battery and gives the cat a small shock if they step on it.  It's just like a static shock.  The vet actually recommended it to me.  It only takes once for the cat to learn not to step on it.  

Don't worry, the cats aren't harmed.  In past years the cats broke so many ornaments, or they'd scale the tree and mess it up.  But this year, not one ornament on the floor.  

THANKS A LOT FOR READING.

MERRY CHRISTMAS!


Tuesday, December 3, 2013

Merry Xmas Sign With License Plates

Christmas is coming up so I made a Merry Christmas sign using letters cut from license plates.  It's pretty easy and you don't need any fancy tools.  


The first thing to do is to find the license plates with the right letters for the sign.  Flea markets or antique shops are a good place to look.  E-bay also has tons of license plates for sale.  I've e-mailed several of the people who sell a lot of plates and they were happy to make a special lot of plates that had all of the letters I needed.  The sign may have been better with only red and green letters, but it depends on what you can get.  Just look around to find what you need to give your sign the look you want.


For the wood part: I used pallet wood for my sign. Cut two pieces big enough to fit the letters.  Then cut two small pieces to use on the back to hold them together                  


Use screws to put it together.  It's a good idea to drill some pilot holes first so you don't crack the wood. Wood glue should do the trick too, you just have to wait for it to dry.
I then used Briwax and steel wool to give the wood a good antique look.  You can find this on Amazon.  The light brown color is good for pallet wood.  I've also seen it at woodworking shops, but not at Home Depot or Lowes.  It gives a great patina if used on old, weathered wood.
                                                                                

Now for the plates.


 I used a jig saw with a sheet metal blade to cut the license plates to get the right letters.


Then use a pair of tin snips to trim down the letters.  I cut some off of the top and bottom of the pieces that I cut from the license plates to make them fit on the wood better.  I also rounded the corners slightly.

Use a nail and hammer to punch two holes in each piece, one at the top, and one at the bottom.  


Then use small screw and a drill with a phillips bit to attach the letters to the front of the sign, using two screws fro each piece.  I suppose you could use some small nails or tacks for this instead.


I thought it looked better to not have the letters perfectly straight.  But arrange them however you want.


I placed the sign on my front porch leaning against a pot of poinsettias,  but you can attach some wire to the sign and hang it on your door, or even put it on a post.

Thanks for reading.


Tuesday, November 12, 2013

Easy Rustic/Farmhouse Style Moose Picture


This is an easy and inexpensive project using some fabric, pallet wood, and spray paint.


What you'll need:

Wood to make the frame, or if you don't want to make one, then use an old picture frame.  I made the inside of the frame 10 inches square, so with the 45 degree angle cuts, you'll need an 8' board total.  

Piece of fabric.  I used a scrap of painter's canvas.

Wood glue to glue the frame together.

Spray paint.  You can use one color as I did here, but if you want the moose to be a different color, you'll need two colors.

A moose picture, printed from the Internet.  I Googled "moose crossing picture" and copied and pasted the image into Microsoft word.  You can then print it out.  I used my printer, which has a scanner, to re-size the image to what I wanted.  Print on some card stock then cut out the picture.  

Stencil Adhesive.


Staple gun


First, make the frame if you don't buy one already made.  I used pallet wood because it's weathered and gives that re-claimed wood look.


Make sure to get pieces that are the same width so the 45 degree angles at the corners match up.  I used my table saw with a sled that I made especially for 45 degree angles.  You can also use a miter saw or a hand saw and miter box. 

It took me a little practice to make this kind of cut fit right, so if you don't feel comfortable with it, you can make the frame without the 45 degree angle on the edges.  Just cut straight pieces to the desired lengths and piece them together.  


I used a biscuit joiner to put the frame together, but glue alone, if you clamp it together good, would probably work.  A pocket hole jig is a great option as well, and really easy to do.  You can find videos on YouTube that show how to make pocket holes. Pocket holes are great for many woodworking projects.


When the glue was dry, I used some steel wool to apply some Briwax (light brown), which gives the old wood a great look.


Once the frame is ready, you're ready to make the moose part.  First, cut a piece of canvas to fit the opening of the frame, plus some extra to allow you to staple it onto the frame.

Lay the fabric on a flat surface.  You may want to put some paper down first, since you'll be using spray paint.  Spray the back of the moose, or whatever picture you decide to use, with the stencil adhesive.  Stick the moose to the center of the fabric.  Then spray with the desired color of spray paint.


When the paint dries, gently peel the cutout off the fabric.


This is what you get.  If you want the moose to be a different color, spray the fabric that color first, allow it to dry completely, then stick the cutout on and spray over with another color, like above.


Now center the image and staple on the back of the frame.  


It's done.


I'm thinking a rooster may look good instead of the moose, or a Christmas tree for the holidays.  

Thanks for reading.